
For the last 3 years, we’ve enjoyed the southwest companion pass. On multiple occasions on this blog, I’ve mentioned that it is currently the best travel hack. The companion pass has provided us the means for direct trips to fly out to Colorado for our road trip, visiting Arcadia National Park for July 4th, visiting family for the holidays, attend the many weddings, and helping us reposition for our international trips. Recently Southwest has also announced that they will be flying to Hawaii as well. One destination I’ve had my eye on when I went for it initially 3 years ago was Southwest’s international destination of Costa Rica.

index
- the decision & planning
- trip report: getting in & setting up
- trip report: Osa Peninsula
- trip report: Manuel Antonio National Park
- trip report: Monteverde Cloud Forest Reserve
- trip report: La Fortuna (or lack of)
- trip report: Tenorio Volcano National Park
- trip report: getting out
- final impressions and budget
the decision
This last year has been a busy period of time in our lives. As such, we were not sure if we were going to be able to get away nor have the time to plan and trip. So when Southwest Airlines opened their schedule for the holiday season, I decided just to book a roundtrip flight to Costa Rica. With Southwest, if we ended up not being able to take the trip, we can cancel it up until 15 Minutes before the flight and get our points back. So it helped us stay super flexible.

The decision to actually go on the trip really wasn’t made until about a couple days before our flight as we were about to make our drive home from visiting family after Christmas. Having done near zero research, we decided to just rent a car and play it by ear.
In terms of what we were looking to do, as always, we aimed to hike a good amount and with Costa Rica’s reputation of an eco-friendly place, we figured that will be easy. What wasn’t as clear was the prospect of multiple day backpacking. Lastly, we want to do some diving and Meg was very excited about the prospect of seeing some sharks.
planning
Due to the improv nature of the our trip, this section of research and resources we used to plan as we made our way around the country. Majority of it took place on our first night in San Jose and all of it on my phone as I forgot my laptop charger in the rushed to pack. When we set off from San Jose, our first destination was the Osa Peninsula for the diving and the possibility of trekking as I’ll describe below. We ended up visiting some of the areas north of San Jose as well, but I’ll leave that up to the trip report.

The resource that I ended up using the most while researching on the go was Ray and Sue’s Costa Rica Guide webpage.
trekking
While surprisingly limited, there are a couple of backpacking options. Additional barriers that makes these prospects difficult are the ever changing regulations and restrictions. Cam from hikinglife has a few dated reports up from 2000, though there are more steps needed now to recreate his trips.
There were 2 options based on Cam’s reports that appealed to us and I looked into planning for once we arrived in Costa Rica. The first was to the highest point in Costa Rica, Cerro Chirrip. However it requires applying for a permit and making a reservation at Crestone Basecamp (email info@chirripo.org with your permit number). James Kaiser wrote a more recent guide on the process here. Being the holiday season, we were not successful in finding permits.
A second option was at Corcovado National Park. Recently the application process to backpack in the park has become more and more convoluted. Ray and Sue gets into the details of these ever changing regulations as part of their larger guide to Corcovado National Park. The basics of regulations required a permit, a guide, and reservation at Serina Station for overnight trips. So logistically organizing through through a tour group or the hotels is almost a necessity. Needless to say, the option of route to hike is dependent on whether a guide is willing to do it and that Corcovado is not a cheap. We opted to try for this option as part of our initial decision to head to the Osa Peninsula
I’ll have more on the Osa Peninsula in this trip report and impressions.
tour guides
There are guide services that will be heavily sold to you at the entrance for most national parks. Other than Corcovado, they are all optional. Of course, getting a guide helps the local economy and will give you a better chance to see animals as they will have binoculars, but the can be quite expensive and at the major parks, you can mostly walk by yourselves and stop when you see a guide group stopped starring off the distance.
maps & gps
For the Costa Rica topographical maps for my Garmin, I was able to find the Openstreetmap (OSM) on their wiki page. In browser, we relied on search alltrials and wikiloc.
diving
Diving was a big reason we wanted to head to Costa Rica where Meg read that she could see sharks.
The best dive site is the Cocos Island National Park. However, it is far off the coast of Costa Rica and why so many large fish stop there. A stay aboard is required to get out with a minimum time of at least 1.5 weeks, which was longer than entire time in Costa Rica.
The second best area is around the Caño Island, just off the coast of the Osa peninsula, where Corcovado national park is located. The diving trips to Caño islands leave out of Drake Bay.
road conditions & driving
Driving in Costa Rica can be quite an adventure. Most highways are one lane roads with plenty of aggressive passing and shared with semis and motorcycles. Google maps is not the most efficient here as it will send you down less traveled and worse conditioned roads. The locals recommend Waze, but we didn’t see a difference. Always look ahead to where the roads are taking you before heading down a worse one since sometimes Google maps thinks it’s sending you down a short cut that turns out to be slower due to the poor conditions of the road. A good strategy we used was never go from a better maintained road to a worse one while in transit. Of course you can’t avoid worse ones at times, especially as you get closer to your destination. Two weeks in Costa Rica has a summary of driving in Costa Rica here.
Despite many unpaved roads in Costa Rica, the 4×4 is up sold to many. The only time I would have been more than happy to go with a 4×4 is the road into Drake Bay (more on that in the trip reports).

Gas prices are regulated by the government in Costa Rica, so it is the same no matter which gas station you use.
money
Us dollars and colons are accepted everywhere. Colons are signified by with ¢ and USD with $. You can usually ask what their exchange rate is and they are usually pretty fair about it. It is also an opportunity to save a little extra if you know your credit card exchange rates. (i.e. if they have a higher colons per dollar, use us. If they have a lower colons to USD ratio, use colons).
communications
Google fi worked for majority of the country other than the remote jungle on the Osa Peninsula. It was also very useful for use to call the diving companies once we were on the ground. For in depth details about different US services in Costa Rica, read Costa Rica Guide’s article.
showers
Many budget hotels and home stays in Costa Rica are equip with “suicide showers.” These are shower systems that provide on-demand hot water by running a circuit through the shower head. They are generally safe despite their looks and you can read about them here. For general bathroom experience, see this Costa Rica Guide article.
equipment
Since we did not have a specific plan other than a rental car and the hotel booked for the first night, we did bring out trekking equipment with us. We only brought 1 sleeping bag to share since it was to such a warm location. However, all those stayed at the bottom of our bags.
trip report: getting in and setting up
Our flight into Costa Rica was one of the simpler itineraries we’ve had. Being southwest, we checked in 24 hours exactly to our flight to ensure we’d board early enough to sit together. We arrived at Baltimore Airport (BWI), checked our bags for free, and landed in San Jose (SJO) after a half day of flights with a short layover in the over crowded Fort Lauderdale airport (FLL).

Our car rental was through National Car Rental, which had a shuttle to take us from the airport offsite to their facilities. Last minute rental and needing an automatic transmission made the cost for the rental higher, but is definitely the way to go for the open ended trip.
Even though we spent a night in San Jose our first and last night, we didn’t spend any time exploring the city. After picking up our car, we checked into the Holiday Inn Express on the outskirts of San Jose that I booked for free with 10k IHG points. The consistency of the Holiday Inn Express provided us with stable internet to plan our trip and breakfast for our morning. The rest of our first evening was spend planning and enjoying a fancy steak dinner.
The conclusion of our planning was to drive down to the Osa Peninsula as I mentioned earlier and work our way back to San Jose. The next morning after breakfast, we stopped by the grocery store across the street for lunch making material and began our drive.
Osa Peninsula
The Osa Peninsula is at the southwestern tip of Costa Rica. We decided it was our first destination because of the diving around Caño Island and the possibility of backpacking Corcovado National Park.
Drake Bay
Drake Bays is the small town that most diving boats to Caño Island depart. It is located on the western side of the Osa Peninsula and I had known that getting to the remote town would be difficult when then first listed options on most webpages was to fly in.
The most taken driving option was to drive to the town of Sierpe to take the water taxi down the Sierpe River and into Drake Bay. For this option, you’d have to leave your car in Sierpe. We were unsure of how safe it would be to leave a car there long term, but seems like you can park at the Las Vegas Restaurant in Sierpe for USD$6 a day.

For bus options, there are TRACOPA Buses from San Jose to Palmar Norte, where you can transfer via collective taxi or bus to Sierpe and then the water taxi. Buses from San Jose also run to Rincon de Osa (not recommended during the rain season between May to Nov) where you can transfer to a day shuttle to Drake Bay. There is also a shuttle from La Palma (just a little further from Rincon de Osa) twice a day to Drake Bay. This is the option most take to connect with Puerto Jiménez.
However we didn’t take the most popular options, we drove all the way into Drake Bay including the 4 water crossings. The reason we did this was based on the conversations we had with the owner of the Osa Divers (tripadvisor), which we booked five dives across two days. When I asked about the best way to get to Drake Bay, he just nonchalantly said to drive in and was confused when we asked about the river crossings. After checking with whomever was with him, he told us the rivers are fine even with out a 4×4.
Despite all the warnings from online sources, we did make it to Drake Bay in our Toyota Corolla. But only try this yourself during the dry seasons. From San Jose, it was mainly on highway 27 before heading south on highway 34 along the western coast until Palmar Norte. The drive took a couple hours longer than we anticipated because of the terrible traffic out of San Jose (nothing like switching from 2 lanes to 1 lane multiple times to bottleneck traffic). We continued south on highway 2 before turning on road 245 to head into the Osa Peninsula. We also took the opportunity to fill up on gas here.

Road 245 was windy, but well paved with parts going to a single lane due to landslides. Just past the town of Rincon de Osa is where we turned right off the 245 onto a dirt road and the beginning of all our fun.


The sun was setting quickly as we reached our first stream crossing, so the pictures are depicting them will be from our way out of Drake Bay. The first crossing was stream and it wasn’t bad, but it’s smart to follow the path taken by other cars or walk it first to check for depth. The streams will change from year to year so be cautious and advance at your own risk. If you have a manual transmission, our friends told us the best way to power through crossing are to stay in 1st gear.

After crossing a paved section with a concrete bridge, the trail starts to head curve up with some elevation gain. During this section, it was common that the wheels will lose traction and slip on the small rocks making up the road. The road is also uneven here, caution is needed so that you don’t bottom out and break something underneath the car if you have a sedan like we did.


The next crossing is just before a small town with a supermarket and place to stay. The stream crossing is right after a small restaurant Rancho Al Mar. The sallowest part when we were there was curving around the wide part down stream (left on the way in and right on the way out),

After the town is the major river crossing across Río Drake. Luckily we were warned about this by a local during on of the earlier crossings. Specially, trying to cross straight through to the other side of the bank can get you stuck and flood your engine as it gets pretty deep, even for 4x4s. The way to go was to cross toward the middle sandbar and continue to the left crossing a the shallow areas to another sandbar before reaching the other side. However, BE WARNED THAT IT MAY BE DIFFERENT FROM YEAR TO YEAR. We found locals more than willing to guide you across the river both times and gladly tipped them for helping, especially since it was completely dark by the time we reached the Río Drake on our way in.

After one more small stream crossing, we finally arrived in Drake Bay in complete darkness. We did see a couple other sedans along the streets. So we weren’t the only idiots to drive all the way in. Interestingly enough, we meet the two other couple that had also driven sedans in later during our time in Drake Bay, they were the ones diving with us. This was by far the most difficult driving I encountered during our time in Costa Rica, so I was pretty set for the rest of our trip as long as I was able to get us out of Drake Bay.

Since we had planned to arrive in town much earlier, we didn’t have a place booked ahead of time. However, we were able to find vacancy at the first place we looked, the Cabinas Pura Vita. It had all we were looking for in reliable wifi, suicide shower with hot water, air conditioning, and breakfast. We were able to call and confirm with Osa Divers (tripadvisor) our diving reservation through Google Fi’s wifi calling before turning in for the night.

We ended up staying in Drake Bay for the next three days and leaving the third day in the afternoon. Cabinas Pura Vita was full the next 2 nights, but we were able to move across the street to the newly completed Hotel Margarita. It had a nice communal space with warm showers and air conditioning, but the wifi did not reach our room.
The town of Drake Bay is situated in the Bay for which it was named with a long beach stretching along its coast.
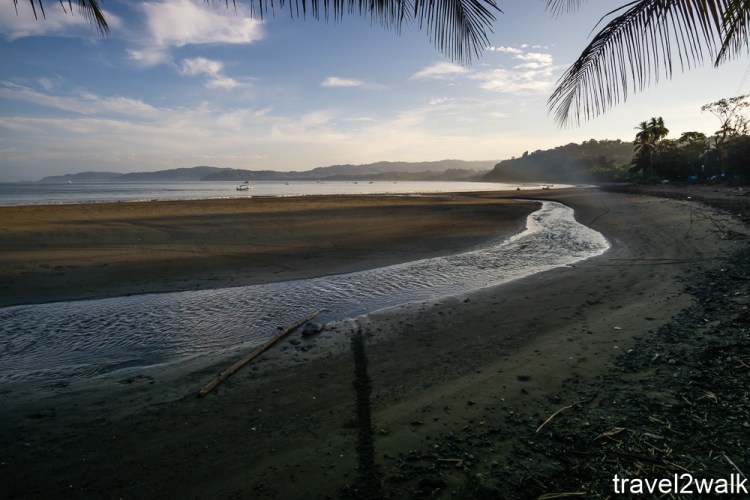
There are a couple supermarkets, plenty of restaurants, hotels, and a couple of bars. During our time there, we enjoyed a dinner with dive friends Mike, Sorrell, and Pushkar at Soda Mar y Bosque with their second story overlook of the town and decent food.

On our third night, we shared another enjoyable dinner and conversations with sibling Mike and Stephanie at Claudios Grill, where their smoothies were great and food was also decent.
While there, we explored possible Corcovado options including backpacking. It was astonishingly difficult to organize any multi-day trip without the cost sky rocketing to USD$1000. The difficulty comes with having to make reservations at the privately run Sirena Station and what guides were willing to do. We were hoping to hike the stretch between San Pedrillo Station to Sirena, but apparently Playa Corcovado closed due to Columbia naval activity. No guides were willing to hike from Sirena to Los Patos station during our time frame. Even the cheapest options of two day and one night out to San Pedrillo was at least USD$200 per person and day trip to Sirena for USD$70 per person. All of it was pretty frustrating, so we opted to try our luck from the larger town of Puerto Jiménez.
Our main goal, however, at Drake Bay was to dive Caño Island and that was what we did.
Caño Island National Park

Caño Island is a protected national park with only a permanent ranger station and it is located on the main beach.


The main attraction at this nature reserve are under the water. During our time here, we dived at four difference sites around the island, the Caves (Shark Cave), The Anchor, The Garden, and Devil’s Rock. Our dive company, Osa Divers (tripadvisor), provided all our diving equipment, provide snacks, and lunch for our 2 days of diving. The equipment were all in good condition our dive groups were no larger than 6 divers. As always, we brought our own googles. Since I’m still using my blog as my dive log, I had 6 kg of weights while Meg had 5 kg.

Enrique (PADI #181975) was our dive master and guide. He was very diligent in tracking and checking with each of the divers. He was also very good at communicating with us, at times bluntly (if we were doing something stupid) but effectively.

During both our days, another diver from the company dived with the group usually at the back of the group so safety was definitely a priority for the company.
Other than diving, there are many snorkeling tours that also run out of Drake Bay.
dive 1: Cueva del Tiburon – Shark Cave
Our first dive was the Shark Cave, though Enrique only calls it the Cave. He said that the Shark Cave, much like some of the other dive sites names, creates too much misconceptions. Specially there is no cave component of the dive, especially one full of sharks. However there are under hangs in the rock formations and we did see sharks,

plenty of white tipped sharks.


Also a lobster hiding among the rocks

and a ray blending into the sandy ocean floor.

On our first dive, we were joined by Mike, Sorrell, and a french couple.
stats for the dive log:
- dive time: 45 minutes
- max depth: 20 feet
- visibility: good
- rating: 3. Plenty of animals including a couple white tip sharks.
dive 2: El Ancla – The Anchor
After a break on the beach, three of us (Sorrell, Meg, & I) aiming for the three dive package went for our second dive of the day. The Anchor is named for a small anchor that lies here, but that was not the highlight at all. We were first greeted by another lobster.

But my favorite was the awesome school of fish that you could get lost in.


We then saw another sting ray,

a few large jack fish,

and another white tip lurking around the ocean bottom. Really, he was just looking for a napping spot like many of the white tips during the day.

stats for the dive log:
- dive time: 45 minutes
- max depth: 45 feet
- visibility: good
- rating: 3. My favorite part of this dive the was the large school of fish bait ball you could get lost in. Meg also says, “SHARKS SHARK SHARKS SHARRRKS!”
dive 3: Jardines – The Coral Gardens
Our last dive of the day was at the Gardens with the who crew. Similar to the Anchor, this site is composed of coral formations.

Among the highlights was a puffer fish,

getting up and close to another ray,

and more bait balls of fish.

But it was a couple of playful white tip sharks that stole the show on this dive.


stats for the dive log:
- dive time: 45 minutes
- max depth: 50 feet
- visibility: good
- rating: 3. Playful white tips were found here.
dive 4: El Bajo del Diablo – The Devil’s Rock
On our second day of diving, we headed out for one best spots for diving, Devil’s Rock. This site is further out from Caño Island with a large pinnacle rising up from a deeper ocean floor

and several canyons

that we explored.

This is typically a more advanced dive with strong currents. We had a smaller group for the dive today with siblings Mike and Stephanie joining us.

There were large schools of fish everywhere we looked.


All the while, more white tips swam around with easy while we pushed against the strong current.


After going from snowing Buffalo, where we were visiting Meg’s family for Christmas, to warm and humid Costa Rica, I was very stuffy on our second day of diving. Equalizing was very difficult as I started to descend and I had to blow pretty hard to do so, a bit too hard it appeared as my nose started to bleed on our ascend. Despite the discomfort, the Devil’s Pinnacle was the best of the dives we around Caño Island.
stats for the dive log:
- dive time: 45 minutes
- max depth: 75 feet
- visibility: good
- rating: 4. Awesome rock formations, large schools of different fish, and more “SHARRRKS”.
dive 5: Jardines – The Coral Gardens
The last dive of our trip was a return to the Gardens. I sat this one out due to the squeeze I had was dealing with. Meg did enjoy this dive as she saw the two playful sharks we encountered on day 1 again.
stats for the dive log:
- dive time: 45 minutes
- max depth: 60 feet
day hike: Drake Bay to Río Claro
We’d had a pretty difficult time trying to organize a trip into Corcovado so we planned to leave Drake Bay after our two days of diving. We decided to wake up early and explore the trails around Drake Bay first before heading out. I wanted to start driving early in the afternoon to avoid problems with the water crossings and to organize things in Puerto Jiménez, where we’d try our luck with Corcovado again.
trail information
- name: Drake Bay to Río Claro
- type: in and out
- distance: 8.7 miles
- elevation change: 2042 ft ascend & descend
- time: 4 hours, 3:15 moving
- location: Drake Bay, Costa Rica (Google maps to trailhead)
- Most that hike this as far as we did will continue all the way to Playa San Josecito. However since we had lunch on San Josecito after our dives and how busy the beach gets, we turned around at Río Claro.
Starting from Playa Colorada at Drake Bay, the trail begins on the west side of the beach. It will continue past a couple of resorts before crossing Río Agujitas over a swinging bridge.

The next section heads uphills before turning left on a paved path and then down a set of paved stairs passing more lodging. Also in this area, we encountered a troupe of white faced Capuchin monkeys both on the way in and on the way back.

The trail will continue alternating between isolated beaches,

streams,

different levels of lodging with well kept flowers.

When the trail nears Río Claro, it starts to head inland and start to gain a little elevation. Do not this take this route as it will be muddy and overgrown and will lead to an part of Río Claro that you cannot cross without being charged a fee by the turtle guy that owns the kayak tours going up Río Claro.

Rather keep to the beach and cross Río Claro at the mouth of the river, where the storks hang out.

We turned around at this point as tour on horse back caught up with us on their way to the busy San Josecito.


ratings (range: 1-5; see link for explanation)
- views: 3. The hike from Drake Bay out to Río Claro was an enjoyable one, especially if you enjoy chilling on pristine beaches. Meg and I, not being the biggest beach goers didn’t stay long.
- difficulty: 1. The trail has a little up and downs, but it’s generally pretty easy going. Our total elevation change was a bit inflated because we ended up taking a route that ended up at a resort we thought would be a garden. You can also turn around at any time or just stay at a beach you like. The beaches along the way are just a good as San Josecito with much less people.
- technical: 1. The trail is pretty clear and is very well trafficked.

Puerto Jiménez
Puerto Jiménez is the remanent of an old mining town. Now it is the major town on the Osa Peninsula with several grocery stores, bank, airport, restaurants, and hotels. We arrived into town early in the afternoon after an uneventful drive out of Drake Bay back onto Route 245, fortunately.

Our goal for driving out early was to look into Corcovado options. However, our plans were foiled again as it was New Years Eve and the National Park is closed on New Years Day. When we inquired about backpacking options after New Years, the only possibility being to drive to the last town Carate along a dirt road from Puerto Jiménez and hiking into Sirena Station and back out the next day. Since Sirena station is privately owned, reservation is needed and you must buy food from them making trekking a very costly option.
Dejected and since we couldn’t book anything for the next day, we decided to eat a luner and find a hotel before deciding our next move. At that point in time, the prospect of us staying on the Osa Peninsula beyond that night was slim, but that would change as I’ll get to below. During our time based out of
The first meal we had was Carolina’s, which was unmemorable and mediocre. But we were recommended to head to Marisqueria Corcovado on the road along the ocean front where it provided a nice place to people watch and Meg’s favorite Ceviche dishes on the trip.


We ended up there for dinner during two of the nights even through it was a little more expensive then other options like the now number 1 rated Soda Jimenez on trip advisor. For cheaper options, the bakery Panadera is a great option and they have really good donuts and sweets. They also open at 5am, early enough for you to grab something before heading out early to see the animals when they are more active and before the colectivo (or local bus/truck) that leaves from Puerto Jiménez to Carate. Of course there are several supermarkets and an awesome fruit stand just off the main street to the west where you can buy everything you need to cook for yourself.
We ended up booking a night at Cabinas Jimenez as it had decent reviews and only a little bit more expensive than our other options at USD$60. Even though it is a bit aged, it had wifi (spotty in some rooms), suicide warm showers, air conditioning, and free use of kayaks. Our room had a fridge.
With the kayaks, you can explore the mangrove along Río Plantanares and Playa Puntarenitas at the far end of Gulfo Dolce. For ease, head up Río Plantanares just before high tide and return after high tide. We attempted this paddle during one of the afternoons, but failed to realize that one of the drain plug on our tandem kayak was not fully closed. This lead to us capsizing at the mouth of Río Plantanares and a bit of tiresome swim. Fortunately, we were able to get a tow to the shore from a local guide where we could dump our kayak and recheck everything. Having had enough of adventure and unsure of the exact problem at the time, we headed back across Gulfo Dolce back to Cabinas Jimenez. If you are uncomfortable setting out by yourselves or want to avoid our misfortunes, there are tours.
All together we stayed at Cabinas Jimenez and Puerto Jiménez for three days and nights, the only reason was that Tom Kayak was filling in at the reception desk when we checked in that first night.
Tom is one of the more unique people you’ll ever meet. He was one of the earliest expats to move permanently to the Osa Peninsula in 1992 after joining his buddy on a trip to Costa Rica. He started the first tour company on the Osa Peninsula guiding hiking and kayaking trips before running a gift shop and botanical gardens with his Costa Rican ex-wife. Seems like the fallout of the divorce didn’t go well in his favor, but it doesn’t seem to phase his resilient free spirit or his dry wit and humor. Now, Tom runs guided tours out of Cabinas Jimenez since he’s buddies with the owner of the hotel (Tom is buddies with everyone in Puerto Jimenez) and that’s where we met him filling in at the front desk. This quick synopsis of Tom doesn’t come close to doing him justice, for that I’d highly recommend hiring him for a tour or play a board game with him (contact: osatomkayak@yahoo.com). If you can’t make it down there, this blog post by Edwin from working on Tom’s botanical gardens in 2003 will give you a glimpse of Tom’s uniqueness.
Tom listened to our disappointment regarding the Corcovado and was able to offer us an alternative, a guide tour among the trails of Bosque del Cabo resort, which only he can bring non-resort visitors to since he’s buddies with the owner. He was even willing to skip the New Year Eve festivities and wake up early on the brand new year to guide us, so we gave the Osa one more shot even though it wasn’t cheap at about USD$100. We were not disappointed.
guided day hike: Bosque del Cabo resort
Tom meet us early at at Cabinas Jimenez as the town was still mostly asleep from the New Years Eve celebrations. Even the local bakery Panadera was not open that day. We all jumped in the Corolla and started driving down the dirt road toward Bosque del Cabo, the private resort that’s at the point of the Osa Peninsula and Matapalo Point. Story time with Tom Kayak begin and it didn’t end for the next 5 hours.
The reason for the early start of the day is because the animals are still out and about from the previous night. Along the road we saw guides pull over staring up at the trees, and we joined after crossing a couple of streams.

Up among the tree were several different types of monkeys. Tom said that there were 4 main types in the Osa, the white face Capuchin monkeys that we saw on our Drake Bay hike, the Howler Monkeys that bark very loudly, the spider monkeys, and squirrel monkeys. We saw some spider monkeys and howlers on our drive after pulling over.


trail information
- name: Bosque del Cabo guided hike
- type: loop
- distance: 4.6 miles
- elevation change: 1165 ft ascent & descent
- time: 5:40 hours (2 hours moving)
- location: Bosque del Cabo Ecotourism Resort, Matapalo Point, Osa Peninsula (google maps)
- This was a private resort that our guide Tom Kayak has access to. You may want to contact the resort if you are interested in hiking their trails.
The hike itself winds through jungles among the resort while Tom wound through story after story of his life on the Osa. There plenty of animals including boars, coatimundis, frogs, ants, spiders, toucans, and more monkeys hidden among the fungi, vines, palms, and vines that became trees.


The resort also had its own elevated bridge and view down onto Matapalo beach.


Tom continued the entire time and wasn’t finished as we returned to Puerto Jiménez.

ratings (range: 1-5; see link for explanation)
- views: 3. The jungles of Bosque del Cabo has much to offer with many animals and plants hidden among the jungle. There were several trail loops at the resort, which is one of the better ones in the Osa. But as all animal based hikes, it’s a crap shoot.
- difficulty: 1. As a guided tour the pace was light, so even the heat and humid didn’t has too much an effect.
- technical: 1. The resort trails were well marked.

day hike: King Luis Waterfall, Matapalo Beach, & hidden waterfalls
After we returned from Bosque del Cabo, Tom suggested we can go by ourselves to explore a few of the other sites around Matapalo point. That includes a few waterfalls, beaches,

and a cool strangler fig turned tree on his buddy Drew’s land.

trail information
- name: King Luis Waterfall, Matapalo Beach, & hidden waterfalls
- type: in and out
- distance: 6.0 miles
- elevation change: 1956 ft ascent & descent
- time: 4:30 hours (2:20 moving)
- location: Matapalo Point, Osa Peninsula start at Martina’s Cantina (google maps)
- We combined to in and out hikes together for 1 hike. Most of it is along dirt road and involves walking up the rivers.
Early the next day, we headed out the same way toward Bosque del Cabo and Carate after grabbing breakfast and lunch from the local bakery. After making the first water crossing, we came to Martina’s Cantina. Tom recommended it being a safe place to park our car and a good starting point to hike into King Louis Falls. If we had a high Clearance 4×4, we could have driven the dirt road all the way to the beach, but we were happy to walk.
The first part of the road walk continues on the road toward Carate and crosses the a river crossing. However, there is a bridge for pedestrians. Remember this stream for later as we return to it for a pretty cool waterfall upstream.

Taking the slow way on the road provides a picturesque green tunnel with blue Morpho butterflies leading the way.

Rustling among the leaves means looking up to find troupes of monkeys.

After a bridge crossing, there a less maintenanced dirt road splits off to the left followed by a quick right to head away from the stream. The dirt road continues passing private lodges and housing. On our return, we saw a few coatimundis running along the road and a sloth up in the trees.


The dirt road ends at the beach, but there is a dirt path that turns right paralleling the beach. We opted for the dirt path to stay out of the sun. After a few minutes, we arrive at the entrance to King Louis falls (follow the sign to the right). The left is private property leading to Drew’s house.

There is a pretty clear trail following the stream and crossing it a few times as you make up the canyon. You can also find ropes tied here by the local guides to allow for people to repel down the small cascades.


However, these aren’t any more interesting than the cascades we see in Virginia, but King Louis is something different.
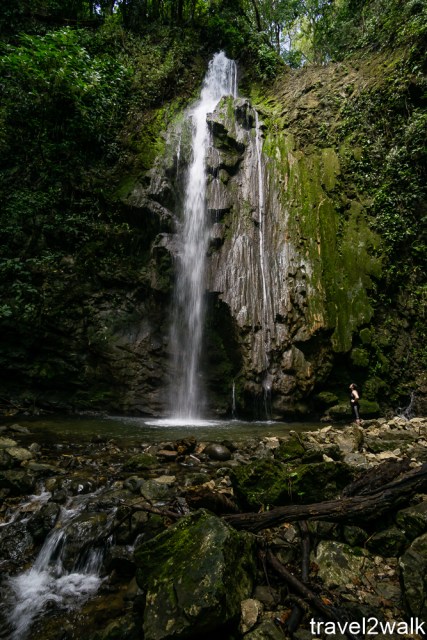
It was nice to cool off below the falls, though the pond isn’t deep enough to be called a swimming hole.


To the left of the falls, there is a trail that heads up the canyon wall and ends just below Drew’s house. Tom told us that there is a large stranger fig tree on his property and said he’ll let us on his land if we name drop his name, which indeed he did. Though I don’t think his female companion was too happy with us as we were there in the morning.
Following the trail away from Drew’s house we came to the large strangler fig tree. While we relaxed on the bench below the tree, another troupe of monkeys went by our heads.

We continued forwards and the trail wasn’t clear at points. Along the way, we found a cool platform with an outlook to the sea. There wasn’t a trail at this point, so we headed down a steep meadow before picking up another set of trails. Following it, we ended up in the backyard of a house near the beach, which we bushwhacked over some shrubs too.
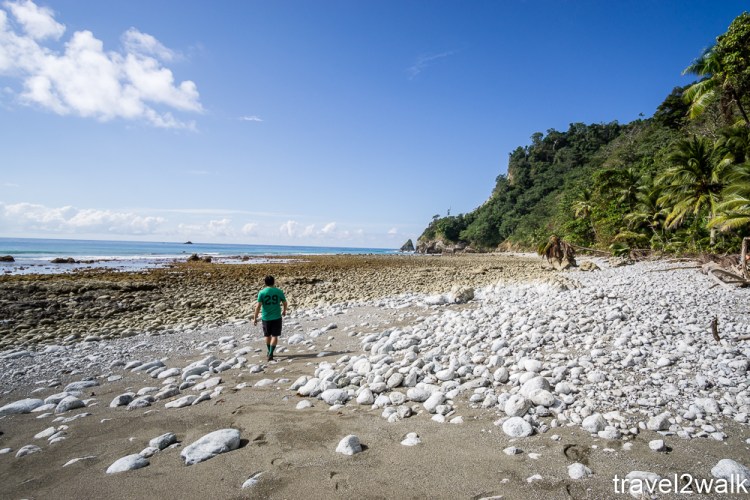
It was a pebble beach and we found someone camped among the trees as we headed back. The beaches are considered public property according to Tom Kayak (while it isn’t clear from Costa Rica Guide), so something to consider if you are planning to camp in Costa Rica.

Along the way, we found many tidal pools as well. This area is known for its surfing as well.

From the beach, we backtracked all the way to that first stream crossing we saw along the main road to Carate. From there we started to follow the river upstream. Expect to get wet along the way as the best way forward is in the stream itself. However, also keep your eye out for dart frogs, which Meg was able to find a couple with orange lines since she always like to be in front.

Scrambling over boulders are expected at certain points while others points require wading through chest high pools. The picture below was on our way out and the deepest point of the hike. The route continues over the rocks to the right at the end of the pool.

After a little more distance along the river, take the opening to the right and you’ll reach a cool water fall and swimming hole. At your own risk, you can climb to the right for some cliff jumping (I did not do this as it does look a bit unstable).

There is a trail up to the left here, but I believe that it is private property and did not explore it further.
After a swim and lunch at the swimming hole, we headed out. We met a lot more groups making their way in then, so seems like the morning time is the best time to go. Once returned to our car, we grabbed smoothie at Martina’s to thank them for watching over our car before heading out.

ratings (range: 1-5; see link for explanation)
- views: 3. The awesome cascades, waterfalls, swimming pools, beach, and tidal pools makes this a very fun and pleasant experience. The negative is that majority of the hike is a walk along dirt roads of varying conditions.
- difficulty: 2. The humid and heat makes this a bit more difficult. Endurance is also needed for hiking up the river.
- technical: 2. Walking along the river bed does provide some technicalities including scrambling around boulders and making your way around the deep part along the river. Since much of these aren’t really trails, you should be able to navigate the roads and the directions.

This ended up as the last day we spent on the Osa. With our time limitation starting to be a factor and the high cost of Corcovado tours, we decided to start making our way north. We thought about a last day driving out to Piro Station, where we heard there may be some day use trails, but decided against it as it wasn’t anything too different from what we had already seen.
Osa Peninsula impressions
The Osa Peninsula is an area full of jungle and good diving. There are plenty of adventures to be had there and the relative number of tourists are still pretty low in comparison to other areas in Costa Rica. You will see many animals visiting the peninsula, but I cannot speak to the actual Corcovado National Park itself.

This is mainly because a guide is now required to backpack in the park. A major difficulty is not only finding a guide, but on that actually will take you on the route you want to go. Secondly the entrance for the park, the guide, and fees to stay at the camp itself makes backpacking very prices. The major site to camp at Sirena Station is now run by a company out of Carate and they require that all food must be bought from them, creating a monopoly on the food there. The reason of preventing the trash from over tourism is understandable, but the regulation put in place is a little bit ridiculous and very costly.
Looking back, it’s understandable why budget report of Corcovado (Stingy Nomads) are more about the alternative lodges rather than the park itself. While the probability to see certain animals, like tapir, are greater around Sirena station, the jungle itself can be enjoyed from many perspectives around the island.
According to Tom Kayak, Sirena station is more about the animals and not necessarily old growth jungle as it was converted from a pig farm. For older growth jungle, it is better to head in land to La Tarder. However, there are far less animals there as the miners that lead to the town’s existence hunted the animals.
Lastly while we were attempting to booking a route, we had thought about going from the western station of San Pedrillo via Drake Bay to Sirena Station along Playa Corcovado. However, we were informed that the stretch is closed due to Columbia activity (perhaps due to drug trafficking) or they just because the guides didn’t want to do it (considering US naval presence in the area).

With early organization, especially during the holiday seasons there are routes that can be backpacked. The followings is a option worth exploring and they report provides information of their guides:
- bus from San Jose to La Palma
- colectivo from La Palma to La Tarde
- hike from La Tarde to Los Patos ranger station – contact Eduardo from La Tarde for tour information: (506 8703 5632) or (506 2200 9617)
- Los Patos ranger station to Sirena ranger station – guided by Doni from La Palma (506 8530 8132)
- Sirena ranger station to la Leona ranger station and exit via Carate
For us, it was enjoyable to dive the Osa Peninsula (Meg’s favorite thus far due to the number of white tip sharks around) and we did encounter plenty of wildlife on our hikes outside of the park. The lack of accessibility, freedom, and infrastructure did make it quiet frustrating and we wouldn’t had as good of an outlook if we didn’t meet one of the more interesting person among our travels in Tom Kayak. As a whole, I’d probably rate the Osa somewhere between 3 to 4 for now, it was worth the visit but I don’t have any desire to revisit anytime soon.
trip report: Manuel Antonio National Park
After six nights and five days on the Osa Peninsula, we started making our way north along the coast. Our first stop we a trip to the popular Manuel Antonio National Park, also know for its whale tail shaped peninsula. We arrive late in the morning and the parking was indeed starting to be packed. We parked just outside of the park and the locals collected a few colons from us as a fee for organizing the parking and watching our car. We then followed the crowds toward the entrance of the park.
trail information
- name: Manuel Antonio National Park
- type: in and out
- distance: est 7.6 miles
- elevation change: est 1633 ft ascent & descent
- time: 4:30 hours
- location: Quepos, Costa Rica (Google map directions to park entrance, car parks are before entrance)
- The park is also open only from 7am to 4pm and are closed on all Mondays.
From Open street maps and google maps, there appear to be trails along that beach section that make it seem like you can make the visit to the park a loop. However, the park has shut down these trails and there is a security guard posted at these locations. Below is the map from the past season, but there was active construction here.

Before you reach the entrance of the park, there is a ticketing booth to purchase park tickets. For foreign visitors, the cost is about USD$16.25 each at the time of this post. If you are planning to use a VISA credit card, it will be charged as a cash advance as it is a bank withdrawal. So cash and fee free debit cards are the best avenues.


A guide is very much optional for this park, but they do contact each other to take the groups to the best animal sites. However, due to the popularity and crowdedness of the park, I’d recommend going in without a guide. If you see a large group gathered somewhere, then its a pretty good bet there is something to see. Furthermore, you can explore the park at your own pace. If you do decide to hire one, you’ll have plenty of opportunity ahead of time or as you walk up to the park entrance. They run for around USD$71. If you want something to drink or snacks for the beach, there are also plenty of stores and stands to meet your needs also.

Upon entering the park, it was clear this experience was not going to be like the our jungle experience in the Osa. The main vehicle access road is crowded as a theme park while the parallel mangrove trail is slightly better. No matter which trail you take, there will be plenty of people.


We turned off left from the vehicle trail to go up the waterfall trail first. The waterfall at the end pales in comparison to others we would see in Costa Rica,

but we did see a few sloth

and a couple butterflies.


It was pretty clear that the wildlife were very much use to the many tourists here unlike the Osa and that Antonio Manual National Park is more like a safari zoo than a national park. However if you want to see wildlife, that’s not too much of a negative if you don’t mind the crowd.
After returning to the main trail vehicle trail to see a tour group gathered around a point dart frog.

We then jumped onto the open portion of the mangrove trail, where many little crabs can be seen crawling up through the mud.

At the next intersection, there was a restroom and a few trails branching away from it. For completeness we headed up the Espadilla Spur for the overlooks. Along the way, we ran into a toupe of White-Faced Capuchin monkeys playing and Howler monkeys barking.


After a long set of stairs, we were treated with a couple of vistas. The last overlooking a coast and Playa Puerto Escondido, which could not be reached.

After the vista, we retraced our steps and took the Los Congos trail to Playa Gemelas.

After a brief break, we continued back via the Playa Gemelas trail as the Playa Escondido trail was closed. Once we reached the intersection with the bathroom, we headed down to Playa Antonio Manual and the whale tail portion of the park.


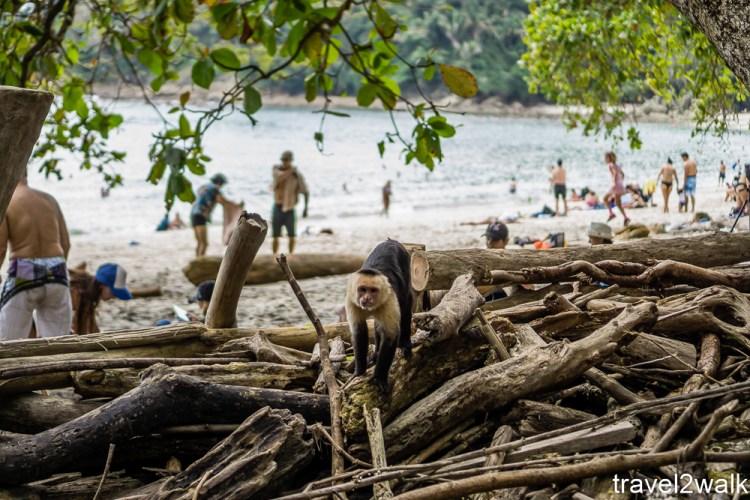
Here was a thin strip of land with beach on both sides. The White-Faced Capuchin Monkeys were well used to humans here and were very apt to stealing the food brought in by beach goers. Though the raccoons were a bit more aggressive.
Since we are not much of beach goers, we didn’t stay long. We continued on the trail along the whale tail called Cathedral Point through the jungle. At the far side, the view is out toward Isla Olocuita, though it wasn’t the most impressive section of the park.

The trail loops back toward the beach on the other side of the whale tail, Playa Espadilla.


At the end of the beach, is the boarder of the park separated by a rock outcrop. As mentioned before, there use to be trails connecting the beach on the park side with the beach outside the park and another trail that connects to the entrance of the park. However, those trails were closed when we visited.
A separate cool feature was an island that is connected by a land bridge to the beach during low tide.

A squadron of the Costa Rican Air force (pelicans) were hanging around the island and dive bombing the unsuspecting fish.


After exploring the beach for a little bit, we crossed back over to the Playa Antonio Manual on the other side of the thin land strip and headed out of the park.

ratings (range: 1-5; see link for explanation)
- views: 3. Manual Antonio National Park felt like a safari zoo with some nice beaches. However, it is very popular and very crowded. You won’t have anything to yourself. It seems like what the park to offer.
- difficulty: 2. If you opt for skipping the vista point via Espadilla Spur, then this would be a 1. Bring water though, because the heat and humidity can get to you.
- technical: 1. All the path are well labeled and well trafficked. There are maps and signs everywhere. The path are mostly paved, wooden boardwalks, or wide dirt roads.

After our hike, we headed to the town of Quepos for lunch at a small restaurant called La Cocina ran by what seem like a group of aunties. It was low cost and good post hike meal.


After check in into our airbnb, we were hit with an unseasonal rain storm. Our host said the out of season rain was an effect of a warm new year in the Northern Hemisphere. It made for a relaxing evening though.
Our airbnb was located next to a Costa Rican Steakhouse Lagarto, which provided a great dinner and a show too. They had a oven that turned wood into coals and they’d then shovel the coals down onto a metal table and grill over it. Staying at the airbnb got us a 15% discount too.


trip report: Monteverde Cloud Forest Reserve
Our adventure the next day was to the Monteverde Cloud Forest. We choose it because of its vicinity to the Arenal Volcano (at least bird flight distance wise). Or preferred plan would have been the Poás Volcano, but it was closed due to an eruption (recent news seem to indicate that it might have reopened).
trail information
- name: Monteverde Cloud Forest
- type: loop
- distance: 4.2 miles
- elevation change: 1583 ft. ascent & descent
- time: 3 hours (1:30 moving)
- location: near Santa Elena, Costa Rica (Google directions)
The road toward Santa Elena and the Monteverde Cloud Forest are mostly dirt roads. So car is needed depending on where you are coming from if you are driving a regular sedan. However it is nothing compared to the Drake Bay drive.
There are multiple trails that you can take at the Monteverde Cloud Forest. They also seem to have changed from time to time. For instance, both maps show below are found within the park with the left one being the more recent rendition.


It seems like the trails Sendero El Río, northern part of Sendero El Chomogo, and Sendero El Pantanoso. The trails still exist, but it seems like they go onto private property. Below is the intersection splits to Sendero El Pantanoso.

After waiting out some construction, we arrived at the entrance of the Monteverde Cloud Forest in the late afternoon. The entrance area had parking and an information center where you bought tickets for entrance. The cost for foreigners was about USD$22. They also provide you with a map and can help you plotting your hike depending on your time.

We opted for the loop option that took us to the main points of the continental divide, the suspended bridge, and the waterfall. You can hire tours once again at the entrance, but you can also use the same tactics as Antonio Manual and stop when you see a group stopped. However, the main attraction for the Monteverde Forest Reserve are the many birds, especially the Quetzal. The guides provide telescoping lenses, so it might be a better experience if you don’t have binoculars.

We started along Sendero Bosque Nosbuso where we encountered a large group starring off the in the distance, perhaps at a Quetzal. I did not see it, but I did catch the hummingbird above.
The second potion of Sendero Bosque Nosbuso was closed for repairs so we continued east on the muddy Sendero Camino


and then on Sendero La Ventera into the clouds. The whipping wind and openings in the clouds made it feel like you were in the middle of a storm.

At the end, there is a platform looking out to both sides of the continental divide. The moving clouds gave us glimpse of both sides, but the still covered majority of the views.


We then retraced our steps before turning right onto the trail for the suspension bridge. The trail was well maintained with honey combed blocks as it made its way though the think forest.

The bridge gave us canopy level look at the forest, but we didn’t see any interesting wildlife despite waiting around for a good 20 minutes.

After the bridge we continued on Sendero Wilford Guindon, Sendero Tosi, and Quebrada Cuecha to reach the small waterfall cascades.

ratings (range: 1-5; see link for explanation)
- views: 3. Monteverde Cloud Forest shows a jungle that is higher up in altitude than the previous hikes we experience on the Osa and in Manuel Antonio. It has a vista, but we saw it with clouds whipping through. Bird watching is probably the reason for tourists of come here and it can boost the experience if you happen to get a glimpse of the Costa Rican National Bird, the Quetzal.
- difficulty: 1. The elevation change here felt very mild and the higher altitude provided a more comfortable hiking environment.
- technical: 1. The trails were well cared for and well signed.

Outside of the Montverde Cloud Forest reserve, there are several cool Strangler Fig Vines that can be found. I didn’t know about it until after our trip, but it seems like a worth while thing to explore.
Google maps has it tagged (directions), though no trails are listed on getting to the tree from the road. The following was left by Jason Allen on That Wanderlust blog that provides instructions on finding the tree:
“From downtown Santa Elena, head up the steep paved road that leads to Monteverde. When you see a sign for “Monteverde Cloud Forest Lodge,” make a left turn onto another steep paved road. This new road will soon become a bumpy dirt road and will continue uphill. Stay on this road until you reach the Cloud Forest Lodge. Drive past the lodge and park on the street just down the hill from the Lodge’s front arching sign. Once parked, look to the left (across from the lodge) and you will see some dirt trails. Follow these trails into the forest until you find the ficus tree.
If you have a GPS, set it for “Monteverde Cloud Forest Lodge” and it will take you right to the street where you will park your car. If you don’t have a GPS, the tree can be found on the South side of the road at the location labeled “Cloud Forest Lodge” on this map (look in Santa Elena – map from Costa Rica Guides)
trip report: La Fortuna (or lack of)
After our hike at Monteverde, we made the drive toward the town of La Fortuna. We decided La Fortuna would be a good place to stay because of it’s proximity to hikes summiting Arenal Volcano or the more likely Cerro Chato with it’s crater lake.
Before leaving Antonio Manual, we book a basic hotel room with breakfast at the San Bosco Inn in the town of La Fortuna. The bird flight distance between Saint Elena and La Fortuna is very short, however the driving distance was not as the drivable road loops around the north west side of Laguna de Arenal. Even though the drive was long, the views on Route 142 after Tilarán was beautiful as the clouds cleared and we were able to get a good views of Arenal over the lake and of the lake itself. We didn’t stop though since we reached our hotel in the dark.
The next morning, the cloud cover returned meaning we wouldn’t see anything if we were to climb upwards, so an audible was in order. Our plan was to visit the La Fortuna Waterfall first before driving north for the waterfalls and warm suffer streams in Tenorio Volcano. However, we got to La Fortuna 1.5 hours before they opened since we were originally looking to do Cerro Chato early and wanted to get back to our booked hotel in San Jose that night, so we decided not to wait around.
Again, you can check out Costa Rica Guide’s info of the area for more of what to do.
trip report: Tenorio Volcano National Park
Tenorio Volcano National Park was the furthest north we’d drive to in Costa Rica and like the other places, it took more dirt road driving to reach the park.
trail information
- name: Tenorio Volcano National Park
- type: in and out
- distance: 3.5 miles
- elevation change: 1304 ft ascent & descent
- time: 2 hours (1.5 hours moving)
- location: Guanacaste, Costa Rica (google map directions)
We were one of the earlier people to arrive at the park around 9:30am as the hours of operation is between 8am to 2pm. The cost of entrance for foreign visitors was USD$12 each. Also according to my tan feet blog, there is a 1200 visitor total limit and a 400 visitor at a time limit.


Similar to the other parks, the OSM maps will show trails that are no longer part of the official trails maintained and listed by the park. Specifically, it is no longer possible to complete a loop of this trail. See comparison below of new (left) and old (right) from Two Weeks in Costa Rica:


Jumping into the river/natural hot springs in the park is not allowed. There were other spas and areas downstream where you should be able to do so, though we did not check them out personally. The first is a free public entrance by the bridge crossing 1 km east of the park entrance noted by Mytanfeet blog, though possible conflicting information from Costa Rica Guide noted that the park services might have closed it due to overcrowding (google map). For USD$6 at Piruri Cabinas (google map), you can also jump in the hot springs.

There is free parking on the street according to wikitravel, but we parked in the lot across the street for a small fee. Again, there are tour guides available, but even more unnecessary here.
There are also stands to rent out rain boots for the mud to be encountered in the park, but I’d question the traction they provide. Our trailrunners (Merrel Moab 2 Vent & Ahnu Montara II) performed well even without gaiters.

The initial part of the trail was a genital descent on a well maintained path. After crossing a stream and the trail begin upwards in a muddy mess. It was clear that the park was working on improving the trails throughout the park by putting in honeycomb cinder blocks, but it wasn’t done yet.

At the first intersection after slightly under a mile, we came to the entrance of the Celeste falls. We decided to head down there first since we knew it will be busy later.

As we headed down the steep descending stairs,

the sapphire jewel of the park was revealed to us.

it was an awe inspiring sight that is hard to describe and even harder to capture on camera.

After marveling at the Celeste Falls for a while, we climbed the stairs and continued on to the other path. At the top of the muddy climb, we reached the outlook. The clouds obscured our view toward any peaks here.

For there, the trail descends back toward the river and Laguna Azul.

The trail continues along the river with a spot along the bank where you can see the volcanic activity bubbling up along the banks. Accompany it is the rotten egg smell of sulfur.

The trail continues crossing a couple of bridges along Río Celeste


until it ends at the confluence between a hot spring fed stream meets that of another stream. The combination of particles between the two streams reflects the light in just he right way to create the turquoise hue (source: Costa Rica Star).

From there, we turned around and backtracked through the mud out of the park.

ratings (range: 1-5; see link for explanation)
- view: 3. The highlight of the hike is the incredible view of the Celeste Waterfall as you descend the long switch backing stairs. I creates a feel of a gem reveling itself in the jungle. However, we were one of the first to be in the park and it does seem to get very busy as the day progresses which may take away from that feeling. This was my favorite hike of the trip and on the boarder of a 4 rating. However, I don’t think I’d return here over exploring other places in the world.
- difficulty: 2. There is some mild elevation change, but a major portion of it is in the mud making it more difficult. However, the park is actively installing honeycomb blocks to form a path when we were there.
- technical: 1. The trail is clear and again well signed.

Check out Costa Rica Guide’s write up of the area for more information and other activities in the area.
trip report: getting out
After our morning hike in Tenorio National Park, we made the long drive back to San Jose. It wasn’t necessarily long in term of distance, but long in duration with the traffic.
Our hotel for our last night in Costa Rica was at the InterContinental Costa Rica, which I splurged and booked with 30k IHG points (relatively cheap for an InterContinental hotel). It turned out for the better as we were upgraded with access to the Ambassador Lounge, where we were able to enjoy both dinner, drinks, and breakfast there. This may have been due to the construction taken place at the hotel.


The next day, we returned our car with no issues. The unseasonal rain had actually cleaned the car of the dirt buildup from all the roads.
Our flight on Southwest was uneventful. There is a departure tax that comes with flying out of Costa Rica, but it was included in our fare cost. It seems like less an issue now days than previous based on the Costa Rica Guide.
final impressions
Costa Rica has created a very strong impression internationally as an championship of ecotourism and nature. To some extent those are very true. The best experiences that comes from tourists are said to be from resorts that have their own trails, guides, access to beaches, and piece of the jungle that naturally comes with a large biosphere. The benefit of these ecotourist resorts are that it is more accessible for travelers, who are not experienced in going out to enjoy nature. They provide an a great catered introduction to the outdoors. At the same time, it allows planned activities for families.
Underneath it all however, it seems like a land grab by foreign interests for land to make money off tourism. Many of these large ecotourist resort originated with foreign companies or expats buying up the lands. It seemed that the local population have more recently jumped in on the process. In talking with some long-term travelers are and have spend much longer time in Costa Rica, they’ve got a sense that below the surface, there still exists inequality and a separation of the haves and have nots despite some what along line of the foreign interests, major monopolies, and Barons on the have side and rest of the population on the have not side despite socially progressive policies. There is a reason why food is more expensive in Costa Rica. However, that may be a rather cynical view upon Costa Rica and I’ll leave it to experts and other places for further discussion on this.
Generally, the locals we typically met were very welcoming and seemed to be happy in their jobs. Furthermore, many resorts may very well be in line with ecotourism and are able to provide a living for locals. There are many several national reserves we were able to visit on this trip. While the cost for foreign visitors were more expensive, I didn’t have an issue paying a larger share as a visitor with more means than locals for the protection and infrastructure built in these lands.
Along the lines of protection for the public lands, the best opportunity for trekking or camping lies within those principles. According to Tom Kayak, the law requires it that public beach access must be granted every couple of miles with the beaches being public land. So camping on beaches are absolutely legal. The best bet for backpacking and freedom camping is to make your own route along the beaches.
Our Costa Rica road trip had us on the road for more than 1313 km or 815 miles, though the traffic and dirt roads made it seem longer. The greatest adventure feel for this trip was definitely the crossing the streams and Río Drake to reach Drake Bay on the Osa Peninsula in our rental Toyota Corolla.
Overall, Costa Rica a place worth going for the biodiversity of seeing the many creatures and plants both in the jungles and the waters. It is also a place great for just for hanging out on the beaches. Also it is great for an introduction to nature to many, especially great with the resort based tourism for families. However, It wouldn’t recommend it as much for the backpacker or those that want to get lost in nature on a backpacking trip. The lack of opportunity and headache that comes with the disorganization and bureaucracy makes it almost impossible without a high cost. For me, I’m happy with how our trip turned out, but I don’t feel the need to go back.
budget

Diving was by far the largest expense we had on our trip and that was expected. The Southwest companion pass was a great way to get us there. Our last minute plans and books also didn’t help to keep the cost down. Overall, housing in Costa Rica is fairly cheap and you can get away with USD $30-40 a night for a room for two. While eating out was cheaper than the United States, a restaurant will still run you between USD$30 to $50 for two. The cheaper way to eat is to opt for sodas (little family run eateries with meals between USD$4-7), bakeries, and grocery stores.

Great trip report! i thought i kept detailed notes – love it! if you ever make the trip to hawaii let me know and i will share mine.
Thanks Joe!
I’d welcome any experience you have to share on Hawaii, it’s a place I look forward to returning to, especially with the low airfare to Hawaii now. What are your favorite hikes, dives, or secret coves over there?